
Appointments Setup
This guide will walk you through configuring your appointment system in CloudBridal. We'll start with essential setup steps to get your basic booking system running, then explore additional features to enhance your customer experience and streamline your operations.
Essential Setup
Before you can start accepting appointments, you'll need to complete these three core steps. Each component works together to create a seamless booking experience for both you and your customers.
Creating Appointment Types
Appointment types define the different services you offer and how they operate. Common examples include bridal appointments (typically 90-120 minutes), bridesmaid appointments (60 minutes), alterations fittings (30-45 minutes), and prom/formal appointments (60 minutes). Your specific setup may vary.
Click Add type on the Appointment types card, or click a type to edit it. The editor has three tabs.
Details:
- Name: What customers see when booking.
- Stage: First-time or follow-up. First-time appointments create a new customer profile when the appointment is confirmed. Follow-up appointments belong to a customer already on file.
- Length: The appointment's length in minutes, plus an optional gap after it to get ready for the next booking. Both are in steps of 15 minutes.
- Color on the calendar: Leave blank to use the room's color.
- Block other bookings at the same time: Gives this appointment the whole shop, like a private after-hours event. Staff can still book manually in-store.
- Staff member type (optional, for staff-based scheduling): Who usually runs this appointment.
- Customer type for new profiles: The customer type given to new customers who book this type (e.g., "Bride" or "Prom").
- Track sales from this type: Counts the appointments that lead to a sale, for the conversion reports.
Booking:
- Who can book: choose Customers and staff, or Staff only to hide the type from your booking page.
- Staff member shown to customers / Room shown to customers: choose Hidden, Shown after booking, or Customer chooses. Customer chooses adds a step to the booking flow where customers pick a staff member (with portrait, name and title, plus an "Any available" option) or a room (with its description). Choosing staff needs schedules based on staff scheduling.
- Picture and description: Shown on your booking page.
- Days of the week, Dates and How far ahead: When this type can be booked. Use Dates for limited-time events like sample sales and trunk shows. How far ahead overrides your shop's booking window for this type.
- Let customers cancel online / Let customers reschedule online: Shown when your shop allows these; turn either off to make customers contact your store for this type.
- What customers see after booking: Your standard page, A message for this type, or A page on your website.
When a type is no longer offered, click Deactivate. Existing appointments stay.
Booking a follow-up appointment:
On a follow-up booking link, the customer enters her email address first. If it matches a profile you already have, she books straight onto that profile without re-entering her name and phone number. If it doesn't match, the full details form appears. The public confirmation and manage pages show the appointment details only — never the matched profile's name or phone number.
Payment (requires Stripe):
Under How customers pay, choose:
- No payment: Customers book without a card.
- Reserve with a card: Customers add a card when they book. Staff can charge up to the fee after a no-show or late cancellation.
- Charge at booking: Customers pay when they book. Requests are charged when you confirm them.
- Charge later: Staff charge the price from the appointment calendar.
Then set the price or fee, how it's Recorded on the customer's profile, and Your appointment policy, which customers acknowledge when they book.
- When the fee is recorded as a sale of an item, turn on Include applicable sales tax in this fee. The customer is charged exactly the price you set, and CloudBridal records the subtotal and tax behind it.
- For paid types, turn on Refund the fee when a customer cancels online to return the full fee when a customer cancels within your cancellation notice period. It is off by default. If the fee was recorded as a sale, that sale is cancelled with the refund; if Stripe rejects the refund, your store inbox is emailed so you can return the fee by hand.
When staff cancel a paid appointment, the confirmation offers Refund the appointment fee. It starts ticked or unticked according to the setting above, and staff can change it either way. A refunded appointment shows Refunded on the appointment and in your appointments list.
Communications:
Appointment message wording and delivery settings are configured in Settings > Communications:
- Pick the message you want to work on — Pending, Confirmed, Declined, Cancelled, Rescheduled, Reminder, or the separate waitlist confirmation and waitlist removal messages.
- Use the appointment type picker to edit either your store-wide wording or the wording for one appointment type. A type with no wording of its own falls back to the store default, so you might keep one general Declined message alongside distinct Confirmed messages for bridal and prom.
- Delivery settings sit beside the wording: reminder timing (1 day before by default), whether appointment emails and SMS go out across your store, and whether an individual appointment type sends them.
SMS requires the Twilio Integration. Keep those messages short and to the point — ideally under 150 characters. For the message editor itself, see Email & SMS Communications.
Emails and texts on an appointment type's Booking tab links straight to that type's messages (Edit emails, Edit texts).
Setting Up Rooms
Rooms in CloudBridal are intended to help you manage your overall capacity. A single room can handle one appointment at a time. Additional rooms allow you to take multiple appointments at the same time.
Rooms are managed in the Schedules card: click Add room to create one, or click a room's name in the schedule grid to edit it.
Room Configuration:
- Name rooms clearly (e.g., "Bridal Suite 1", "Alterations Room")
- Appointment types it can host: Restrict specialized appointments (like alterations) to the right rooms. Leave it empty to host every type.
- Color on the calendar: Used for appointments whose type has no color of its own
- Description and Picture: Tell customers what the room offers — shown when customers see or choose rooms on your booking page
- Consider creating temporary rooms for busy seasons or special events
A room with upcoming appointments, or appointments booked straight into it, can't be deleted. Click Deactivate instead: it's no longer offered for bookings, and existing appointments stay.
Which room fills first:
When more than one room is free at the same time, a booking made online goes to the room nearest the top of the Schedules grid. To change which room fills first, drag a room up or down by the handle next to its name. Until you change it, rooms fill in the order you added them. Rooms with no hours yet sit below the others until you add some.
This applies to every booking CloudBridal places in a room for you: your booking page, a customer rescheduling, your website or AI assistant booking through the API, and a waitlist request being confirmed. When customers choose their own room, they see your rooms in the same order. Bookings you make yourself go in the room you pick.
Configuring Schedules
Schedules determine when appointments can be booked. Each schedule covers one room on one day of the week.
The Schedules grid lays this out with your rooms down the side and days of the week across the top. Each cell shows how that room is bookable that day — its fixed hours, or the staff whose working hours drive it. From the grid you can:
- Hover an empty cell and click + to add a schedule for that room and day
- Click a cell to edit its schedule, or a room's name to edit the room
- Click a day's header to preview that day's bookable times
- Spot problems at a glance — cells show a warning when a schedule needs attention, such as no staff in its pool scheduled to work that day
Open Hours:
Open hours come from one of three options:
- Fixed hours: The room is open between the times you set, regardless of staff schedules. Most shops use this.
- Any capable staff member's schedule: Bookable whenever any staff member who can handle the appointment type is working.
- Specific staff members' schedules: Bookable whenever the staff members you select are working.
The two staff options are for shops that schedule by staff. They pull working hours from the Staff Schedule page, and CloudBridal automatically assigns one staff member to each booking. For specific staff, Who gets booked first controls the assignment: In listed order picks the first available person in your drag-ordered list, and Balance daily load picks whoever has the fewest appointments that day. Schedules based on any capable staff member always balance the daily load. Per-staff controls — which appointment types each person can handle and a daily appointment cap — are set on the staff member in Settings > Staff members.
Other schedule settings:
- Times: When the room opens and closes for booking on fixed-hours schedules. Staff-based schedules follow staff working hours unless you turn on Set hours.
- Start times: choose Optimal fit to pack appointments back-to-back and maximize your daily capacity. Every 15 minutes, Every half hour and On the hour start them on the clock, which is more familiar to customers but can leave gaps between bookings.
- Preview and edit: Shows every time the schedule offers per appointment type, and lets you turn individual times off.
- Automatic confirmation: Online bookings in these hours are confirmed straight away. If it's off, a staff member must confirm each incoming appointment.
- Staff bookings only: Customers can't book these hours online. Useful for reserving capacity or after-hours appointments.
- Deactivate: Takes the schedule out of booking without deleting it.
Advanced (options most shops leave off):
- Nearby times only: Only offers times next to existing appointments. This can significantly reduce online bookings, so most stores should leave it off.
- Minimum notice: Overrides your shop's minimum notice for these hours. This is great for situations like weekend appointments where you require additional preparation.
- Dates: For seasonal or event-based capacity (like special prom hours), limit a fixed-hours schedule to date ranges.
To open, close or change hours for a single date (a trunk show on one Sunday, a holiday), don't change the weekly schedule: open that date on the Appointments calendar and use Manage day. A change there applies to that date only.
Previewing Availability
Click Preview availability at the top of the Schedules card to check your setup: pick a date and appointment type to see exactly which times customers can book — and why other times are unavailable, including times inside your minimum notice and dates further ahead than customers can book. When a day has no times at all, it says why (for example, no room offers that appointment type that day).
You can open the same preview from Manage day on the calendar (What can customers book?), and from the scheduling assistant while booking an appointment.
Configuring Questions
After you've configured schedules, you're technically ready to start taking appointments! However, it's a good idea to make sure your booking form captures everything you need to run the appointment. Open the Booking questions tab in Settings > Appointments.
Default Questions
The Default questions table lists the questions built into the booking form. Ask controls whether each one appears, online and when staff book; Required controls whether customers booking online must answer it.
- Name, Phone number and Email are always asked. Turn on Require first and last name for online bookings to refuse a single-word name online; staff-created appointments are not affected
- Event date, Venue (shown to customers as "Event venue", off by default), Questions or comments, First visit, Home address and How they found you can each be asked or left off
Event-Date Window for Online Bookings
If you only want online bookings when the event is a sensible distance away, turn on Only accept online bookings within an event-date window on the Event date question. Off by default.
- Set At least and No more than days after the appointment. Leave either box empty for no limit on that side.
- The Event date question is shown and required for new online bookings while the window is on, and can't be hidden.
- A customer whose event date falls outside the window is told the limit and asked for a different date before she can finish booking.
- Staff booking in the back office see a warning but can still create the appointment.
- Existing bookings, and follow-ups booked from a customer profile, are unaffected.
Your Own Questions
To ask something the default questions don't cover, such as budget, dress size or social media handle:
- Under Your own questions, turn on Ask your own questions on first-time bookings or Ask your own questions on follow-up bookings.
- Click Add question.
- Fill in the question. Much of this works like other Custom Fields:
- Name and Answer type: The question customers see, and the kind of answer it takes.
- Hint: A short note shown below the question.
- List of answers: Offer a list of Choices instead of free typing; Several answers lets customers pick more than one.
- Lists and Reports (first-time questions): Show the answer in the appointment list or as a report column. Most questions can leave these off.
- Width on the form: Only affects the staff booking form; customers always see the full width.
- Who answers it: Whether Customers booking online and Staff booking an appointment are asked, and whether each must answer.
- Where it's asked: Limit the question to certain appointment types.
Other Setup
After you've configured the essentials, you can tweak some of the other settings to your liking.
Calendar & Staff Settings
- Calendar colors: Changes how event colors display in the appointment calendar.
- Show a compact calendar: Fits more of the day on screen.
- Show only open days: Hides the days you're closed in week and month views.
- Visit stages: Track where a customer is in a series of visits (first fitting, second fitting, pickup) without creating a separate appointment type for each one. Click Edit stages to add them, and drag to set the order staff see them in. Pick the stage on a follow-up appointment.
- Staff emails: Choose whether the shop email hears about bookings and changes, including bookings staff make, and whether it gets a calendar invite for every booking change.
Online Booking Settings
The Online booking tab holds the rules for customers booking on your booking page. Staff can always book and change appointments.
- Let customers cancel online / Let customers reschedule online: Whether customers can make these changes themselves, and the Notice needed in hours. Appointments inside the notice period can't be changed online. Can be turned off per appointment type.
- How far ahead customers can book: At least so many hours ahead (default: 12), and up to so many months ahead (default: 3). Can be overridden per appointment type. Bookings and reschedules past the latest date are refused, whether they come from your booking page, a customer's manage link, or the API. A customer can still move to another time on the same date.
- Let customers join a waitlist: Customers can ask for a time that's already full. If a cancellation occurs, the eligible waitlist request shows under Booking requests on the calendar, where a staff member can reach out to the customer and offer the slot.
- Show which dates have openings: Marks which dates still have openings in the booking calendar customers see.
Page After Booking
You can customize the message shown to customers after they book, with a separate message for each outcome: confirmed bookings, booking requests, and waitlist requests. Set your shop-wide messages under Page after booking on the Online booking tab. If you don't customize a message, the default text is used.
An appointment type can override this under What customers see on its Booking tab: use A message for this type, or send customers to A page on your website.
Appointment Policy Acknowledgment
When an appointment involves a payment or saved card, customers are asked to acknowledge your cancellation, no-show, or payment policy before completing their booking. This creates a record of the customer's consent that you can reference later.
To view the acknowledgment record for a specific appointment, open the appointment and select View policy acknowledgment from the actions menu. This generates a printable document showing the policy text, acknowledgment timestamp, and details of the payment authorization.
Making Your Scheduler Available
You have several options for making your scheduler available to your customers. These are all in the Booking links card on the Online booking tab of Settings > Appointments.
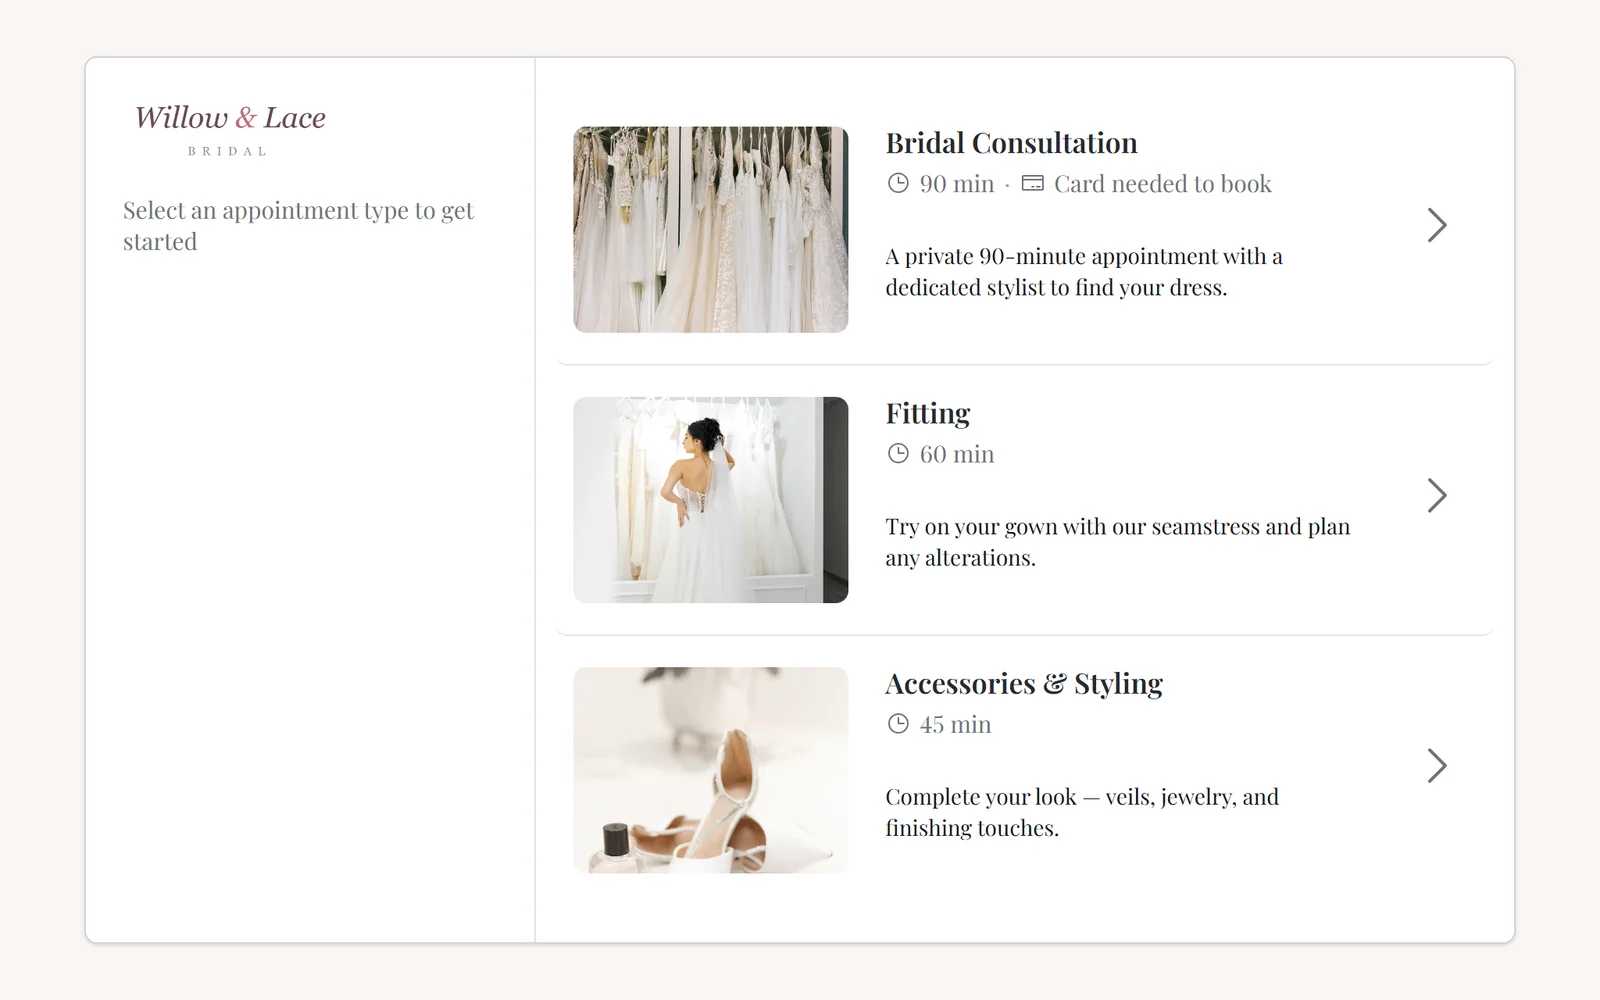
- Your booking page
- Show all available appointment types
- This is a very simple option with just a single booking link. When a customer clicks this link, it will bring them to a page where they can select their desired appointment type and proceed with the booking.
- A link for each type
- Create links for specific appointment types
- This is a good option when you want to have full control over your web page design. You can create a page with details about your appointment types and simply add these links to your booking buttons within the page.
- On your website
- Put the scheduler directly on your own page with the Embed code, so customers book without leaving your site. For the two embed options, website-builder caveats, and step-by-step instructions, see Embedding CloudBridal on Your Website.
Updated on: 19/10/2026
Thank you!