
Inventory Management
CloudBridal provides powerful tools to manage your store's inventory, making it easy to track items, manage variants, process sales, and handle special orders. This guide covers the essential features of the inventory management system.
Prerequisites
Before you enter any inventory items, you should first ensure that you've properly configured your inventory settings. See the Inventory Item Settings Reference section near the bottom of this article for details.
What Inventory Means in CloudBridal
Many believe that inventory management is only important for physical products, but this is not the full picture. Inventory in CloudBridal can be used to manage any item that you sell, whether it's a physical product, a service, an add-on, etc. When your inventory is properly set up, the sales process will go smoothly and efficiently.
Items in CloudBridal are structured based on their Item type. This is a way to categorize your items so that you can manage them accordingly. Common item types include:
- Dresses
- Accessories
- Veils
- Services
- Other
You should customize the item types that are available to you in Settings › Items and make sure that you've covered all of the different types of items that you sell through your store.
How Inventory is Added
Inventory items are added in three main ways:
- By adding a new inventory item through the Inventory page. This is the easiest and most straightforward way to create an inventory item.
- When receiving a stock purchase order. This is handy if you want to track the full lifecycle of acquiring inventory.
- Through the data import tool. This is mainly intended to help you import your initial inventory when you first set up your store.
Stock also comes back in when a From Inventory sale is cancelled or returned. Use Return to stock on the order rather than editing quantities by hand — it returns exactly what the sale consumed, at the cost the units left with. See Returns, Refunds & Exchanges.
Searching Your Inventory
The search box on the Inventory page matches item names, vendors, and custom fields — and also variety names, sizes, and colors, so you can type "ivory" or a size to find every item that offers it (including items currently out of stock). The item search on the order form works the same way.
The Inventory Item Form
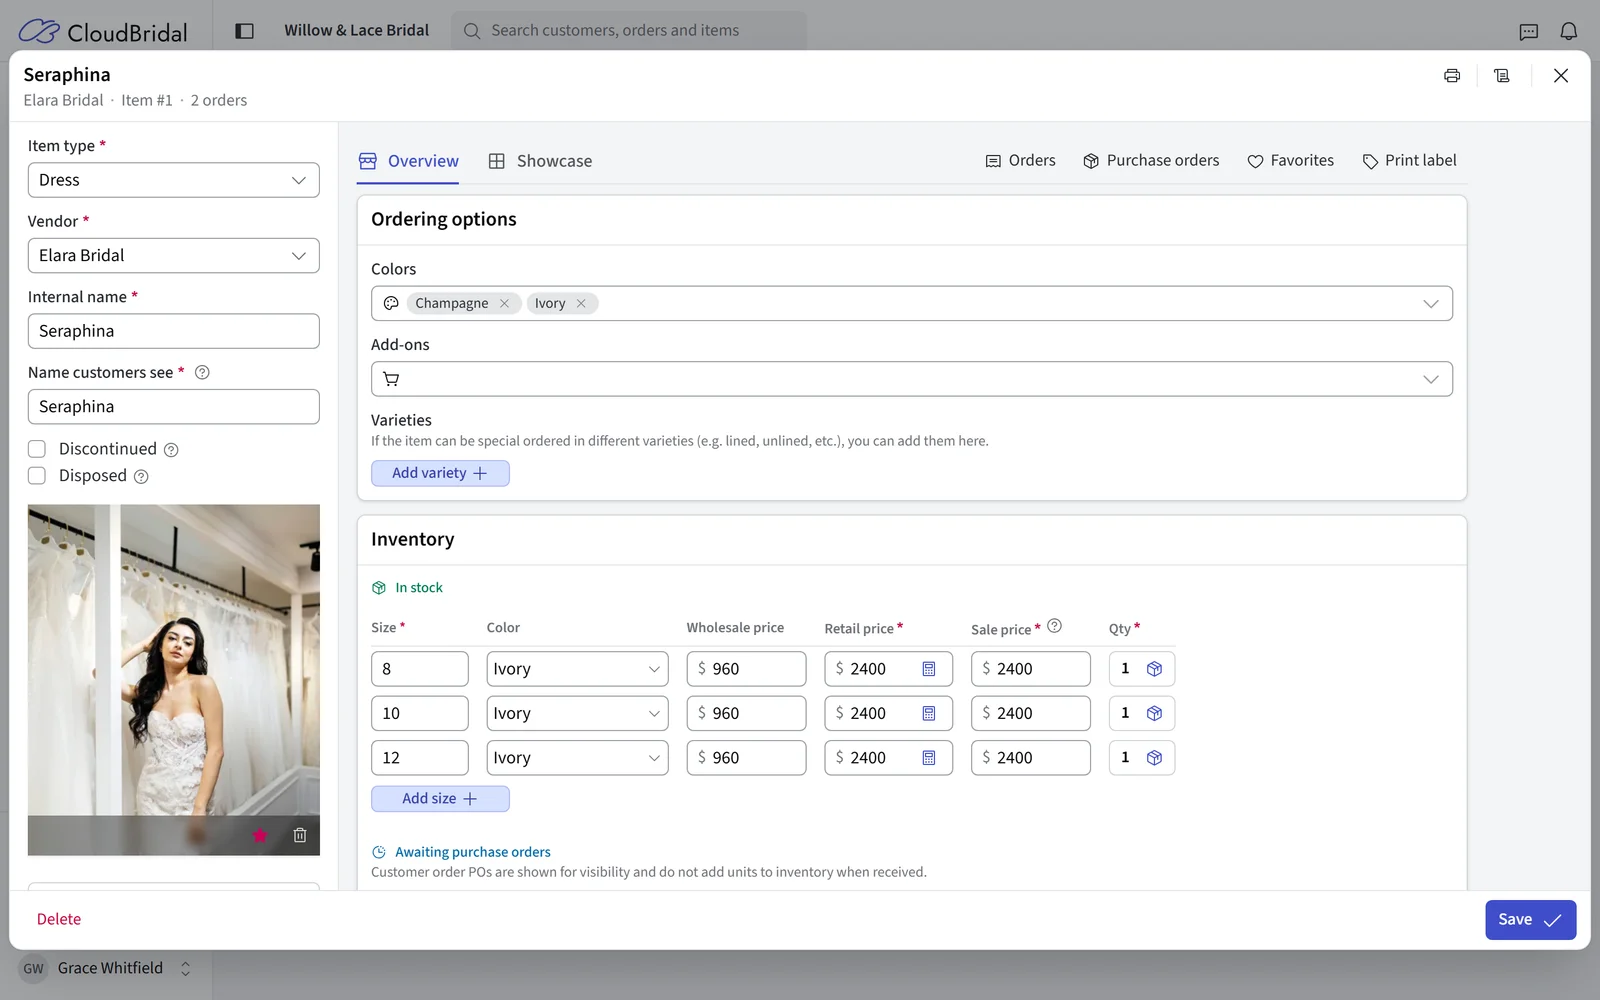
When you add or edit an inventory item, the inventory item form will appear. This form shows you all the relevant information for the item and allows you to manage the item accordingly.
Core Item Details
The left side of the form includes the core item details:
- Item type: The item's main category (e.g. Dress, Accessory, Veil, etc.)
- Vendor: The supplier or designer of the item
- Internal name: This is usually the vendor's item name.
- Name customers see: The name shown in all customer-facing places like receipts, labels, and the showcase. A new item starts with its internal name here; change it to show customers something different, for example your own name for a private-label dress.
- Discontinued: If checked, this means the item is no longer available for special order from the vendor.
- Disposed: If checked, this means the item is no longer available for sale and is only being maintained for historical records. Typically, you would also 0 out the quantity of the item when it is disposed.
- Images: Upload your own photos, add a photo from a link, or use Search online (Ultimate Plan) to find photos of the style.
Searching Online for Photos
- Enter the vendor and the item name, then click Search online under the images.
- Select the photos you want and click Add photos.
- Save the item to keep them.
- Photos come only from the designer's website. Photos of the style you searched for are listed first. If there are none, you'll see the designer's other styles instead.
- To search for something else, such as a style number or color, change the text at the top and click Search.
- To find more angles of a photo, click the arrow in its top corner to open its page on the designer's website. Copy the image address of any other photo there, then click Add from link in the search window and paste it. You can also paste the address straight into the search box.
- For designers CloudBridal doesn't recognize, you'll be asked for their website once. It's saved as the vendor's Designer website; click Change website to correct it.
- Each search counts toward a limit of 1,000 searches every 30 days, shown at the bottom of the search window. Repeating the same search within an hour doesn't count again.
Adding a Photo from a Link
- On any website, right-click the photo and choose Copy image address.
- Click Add from link under the images, paste the address, and click Add photo.
- Save the item to keep it.
- If the preview doesn't show a photo, you likely copied the page address instead of the image address.
- Only use photos you have permission to use, such as those from designers you carry.
Stocked Items & Varieties
Two cards on the item form define what customers can order and what you have in the shop:
- Ordering options — the size chart, colors, add-ons and varieties available for special order.
- Inventory — the sizes (or variants) you stock, with their prices. For item types that don't track stock, this card is called Pricing.
Colors
This field allows you to specify the different color options that this item can be ordered in. Only visible when the item type has color tracking enabled. These colors will be selectable in the order form when a customer wants to order this item.
Add-ons
It is very common to modify a special order with additional services or customizations. For example, a customer may wish to pay a rush shipping fee on their order to have it fulfilled quicker. The Add-ons field allows you to capture such addons. You should use addons for fixed-fee additions to an order that add to the base price of that order.
Addons can be defined at two levels:
- Vendor-level addons are reusable across all items from that vendor. Configure them on the Vendor record.
- Item-specific addons are defined directly on the inventory item and apply only to that item. Use these for one-off addons that don't apply to the vendor's other items.
When the item is sold, both levels appear as available addons on the order form.
Inventory
This card lists the sizes or variants of the item that you stock. Click Add size (or Add variant) for another row. Based on how you've configured the item type, these fields may be available:
- Size or Name: For items with size tracking enabled (e.g. Dress), this is the size of the item. For other items, this is the name of the variant.
- Color: Available if color tracking is enabled for the item type.
- Variety: This displays only when you have added more than 1 variety for this item - see Varieties below.
- Qty: Current stock level. Type it for a new row; on a saved row, click the number to open its stock window (see below).
- Pricing:
- Wholesale price (if enabled): The cost to order this variant from the vendor.
- Retail price (required): The item's suggested retail price (MSRP).
- Sale price (required): The actual price that you sell this variant for from stock. This is automatically set to the retail price, but you can change it to something different if needed. Special orders use the retail price.
The system includes a retail markup calculator (the purple tag button) to help determine appropriate pricing based on wholesale costs.
Changing Stock
Clicking a saved variant's quantity opens its stock window, titled with the item, size and color. Each row is a batch of stock you received, with its received date, how many came in, how many are left, and what each one cost.
- Every row is editable straight away. Save changes saves everything together, or nothing if something goes wrong.
- The strip at the top shows In stock, Value on hand and Average cost. Staff who can't see wholesale prices see only the count.
- Add stock adds a new batch. To remove a batch, use its bin: None left keeps the record at 0 with its history; Delete the record is only for a batch added by mistake.
- If a deleted sale put this item back in stock in the last day, the window says so, and asks before you save more stock — there's no need to add it again by hand.
Varieties
These represent variations available for special ordering from vendors:
- Create different options for special orders (e.g., lined vs. unlined, standard vs. custom length)
- Each variety can have its own pricing structure
If you've added more than 1 variety for an item, you will then need to set which variety you have in stock (if any). Additionally, the variety becomes a required field in the order form and is also then surfaced for purchase orders.
Item Notes
You can add any free-form notes about the item here. This is useful for adding information that you don't want to display to customers, but still want to keep track of.
Item Attributes
Depending on the item type, different attributes may be available:
Dress-Specific Attributes
- Fabrics: Materials used in the dress
- Silhouettes: Dress silhouette styles
- Necklines: Types of necklines
- Embellishments: Decorative elements
- Season: The season the item belongs to
- Year: The year the item was released
All of these attribute options can be configured in Settings › Items.
Item Tags
You can also add tags to the item. Tags are custom labels to apply to the item, and have several uses:
- Filtering: You can filter items by tag in the inventory list.
- Inventory showcase: You can surface tags in the inventory showcase, which allows your clients to view items by tag.
Inventory Showcase
Plan Requirement: Ultimate
Control how items appear in your inventory showcase from the item's Showcase tab:
- Item description: The public-facing description shown in the showcase
- Hide item from showcase: Excludes the item from public view
- Share link: A short link to this item's showcase page you can copy and text or email to a customer. It appears once the item is saved, and warns you if the item isn't currently visible in the showcase.
Label Printing
Plan Requirement: Core or Ultimate
CloudBridal integrates with DYMO Label printers to allow you to print labels for your inventory items. To learn more on how to set this up, please refer to the Label Printing & Scanning documentation.
Inventory Item Settings Reference
The Items settings page allows you to fully customize how your inventory is organized, displayed, and managed in CloudBridal.
Customizable Inventory Item Types
CloudBridal offers fully customizable inventory item types, each with its own fields and behavior. Open an item type under Item types to set:
- Name: The name of the item type (e.g. Dress, Accessory, Service).
- Sales tax: Shows which tax rates apply. Each tax rate chooses its item types on the Sales tax page. See Sales Tax Setup.
- Track stock: Counts how many of each item you have in the shop. Leave it off for services and fees.
- Purchase orders (when purchase orders are on): whether staff can add this type to purchase orders. Turn it off for item types you never order from a vendor, such as in-house alterations.
- Default vendor: Filled in on new items and orders of this type. For work you do in-house, such as alterations, choose the vendor you set up for your own shop.
- On an order with other items: whether the item has its own status (ordered, arriving and picked up on its own, like a veil from another vendor) or follows the main item (moves with it, like alterations or a fee).
- Price changes: lets staff change the price after ordering. Useful for alterations, which are often priced later.
- Prospects: whether an order of this type makes a prospect a customer. Turn it off for fees, such as an appointment fee, so paying one doesn't count as a sale.
- Paid to another business (with Stripe payments): for work a separate business bills. Orders with this type can't be paid by card through CloudBridal.
- On the item and On orders: Which fields staff see, and which are required, on the item form and on orders.
To stop using an item type, click Deactivate: it can't be chosen for new items or orders, and items and orders that already use it keep it.
Label Printing Settings
Plan Requirement: Core or Ultimate
Label printer and barcode scanner settings are in Settings › General under Devices & printing. See Label Printing & Scanning for details.
Selectable Options
Under Lists, customize the options staff pick from on inventory items:
- Dress Fabric Types: Lace, Satin, Tulle, Chiffon, Crepe, Organza, Mikado, Silk, Taffeta, Etc.
- Dress silhouettes: A-Line, Ball Gown, Mermaid, Sheath/Column, Fit & Flare, Trumpet, Tea Length, Empire, Princess, High-Low, Etc.
- Dress necklines: Sweetheart, Square, High Neck, V-Neck, Plunging, Portrait, Halter, Straight, Bateau, Jewel, Scoop, Queen Anne, Illusion, One-Shoulder, Off-the-Shoulder, Strapless, Etc.
- Dress embellishments: Beading, Sequins, Embroidery, Crystals/Rhinestones, Pearls, Appliqués, Buttons, Fringe, Bows, Ruffles, None/Minimal, Etc.
You can add, edit, or remove options to match your inventory needs.
Inventory Tools
CloudBridal includes a suite of inventory management tools to help you keep your inventory clean and well-organized. Access these from the More menu (three dots) in the top right of the Inventory page, or from the Tools section of Reports & tools.
- Physical count: Conduct a full physical inventory count using barcode scanning or manual search. The system identifies discrepancies between your recorded and actual stock levels, and adjusts quantities when you finalize. See the Physical Inventory Count guide for details.
- Inventory Transfers: Move stock between linked stores with a full audit trail. See the Inventory Transfers section below for details.
- Disposal candidates: Find items with zero stock across all variants, making it easy to clean up items that are no longer available.
- Discontinued with stock: Identify discontinued items that still have remaining stock, helping you plan clearance or disposal.
- Slow movers: Analyze sales velocity to spot items with low turnover, including days available, sales per month, and cost value on hand.
- Missing wholesale prices: Quickly find and update variants that are missing wholesale cost data, with inline editing.
- Bulk price update: Update retail, wholesale, and sale prices for all items from a specific vendor in one view (admin only).
Inventory Transfers
If you operate multiple locations through Linked Stores, inventory transfers let you move stock between them with a full audit trail. Open from the Inventory page by clicking the Transfers tab, then New transfer to start one. Either store can initiate (send out or request in), the receiving store confirms receipt to add the units to its stock, and a pending transfer can be cancelled from either side.
For the full workflow — composing transfers, the Stock Across Stores popover on inventory items, the receive preview, cancellation, and the permission model — see the Inventory Transfers guide.
Custom Fields
In addition to default fields, you can create custom fields for inventory items. See Custom Fields for more information.
Updated on: 19/10/2026
Thank you!